If your embroidery designs look distorted, shifted, or puckered, the problem often isn’t your machine—it’s your hooping technique.
Proper hooping is one of the most important skills in machine embroidery, yet beginners often overlook it.
This machine embroidery hoop tutorial will show you exactly how to hoop fabric correctly, avoid common mistakes, and improve stitch quality instantly.
Why Proper Hooping Matters in Machine Embroidery
Hooping is what holds your fabric and stabilizer in place while the machine stitches your design.
If hooping is wrong, you may see:
- Fabric shifting during stitching
- Puckering around the design
- Misaligned embroidery
- Uneven stitch density
- Thread break issues
👉 In short: bad hooping ruins good designs.
What You Need Before Hooping
Before starting, make sure you have:
- Embroidery hoop (correct size for design)
- Fabric
- Stabilizer (cut-away, tear-away, or water-soluble)
- Embroidery design ready
Optional but useful:
- Temporary adhesive spray
- Hoop grip tape
- Fabric marker for alignment
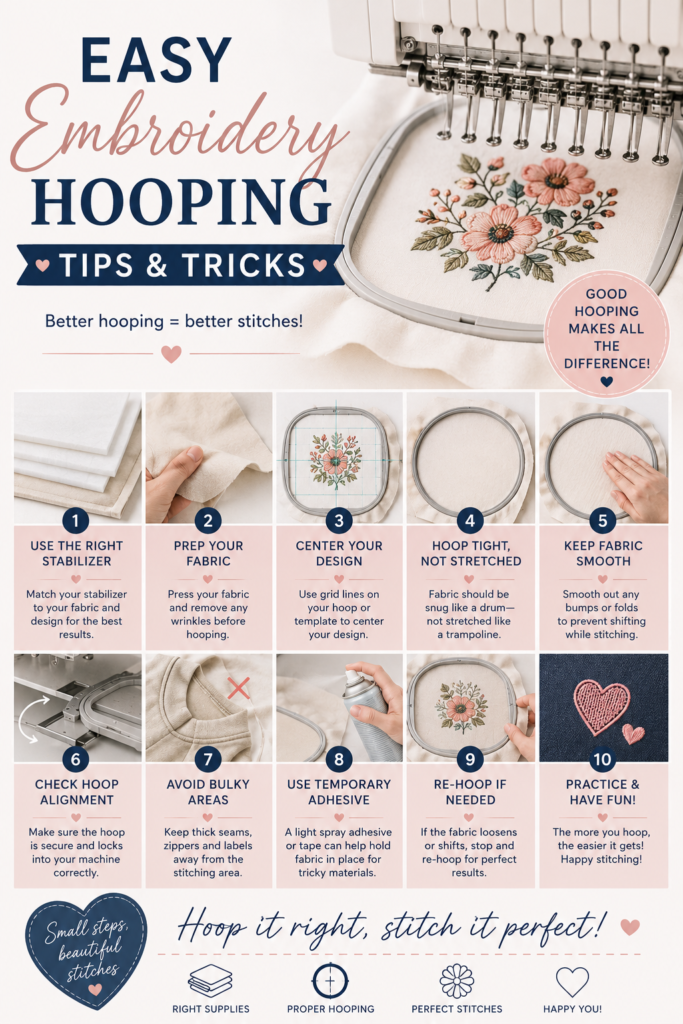
Step 1: Choose the Right Hoop Size
One of the most common mistakes is using a hoop that’s too large.
Rule of thumb:
- Use the smallest hoop possible for your design
- Design should fit comfortably without excess empty space
👉 Smaller hoop = better fabric stability.
Step 2: Prepare Your Fabric and Stabilizer
Place stabilizer behind your fabric before hooping.
Match stabilizer to fabric:
- Cut-away → stretchy fabrics (t-shirts)
- Tear-away → stable woven fabrics
- Water-soluble → delicate or decorative fabrics
Make sure both layers are smooth and wrinkle-free.
Step 3: Loosen the Hoop Screw
Loosen the outer hoop slightly so fabric can be inserted easily.
Do not fully remove tension—you just need enough space to insert fabric.
Step 4: Layer Fabric and Stabilizer
Place them in this order:
- Outer hoop (bottom)
- Stabilizer
- Fabric
- Inner hoop (top pressure layer)
👉 Always keep fabric aligned straight with no stretching.
Step 5: Hoop the Fabric Evenly
Press the inner hoop into place slowly and evenly.
✔ Fabric should be taut like a drum
✔ No wrinkles or slack areas
✔ Stabilizer should sit flat underneath
🚫 Do not pull fabric too tight—this can cause distortion after stitching.
Step 6: Tighten the Hoop Securely
Tighten the screw until fabric is secure but not overstretched.
Check:
- Fabric does not move when gently tapped
- No visible distortion in weave
- Stabilizer remains flat
Step 7: Check Alignment Before Stitching
Before starting embroidery:
✔ Double-check design placement
✔ Ensure hoop is locked into machine correctly
✔ Run a slow test stitch if needed
👉 This step prevents wasted materials.
Common Hooping Mistakes (Avoid These!)
1. Overstretching fabric
Leads to puckering after removing hoop.
2. Loose hooping
Causes shifting designs and uneven stitches.
3. Wrong stabilizer choice
Fabric cannot support stitch density.
4. Reusing old hoop tension
Worn hoops may not grip fabric properly.
Pro Hooping Tips for Better Results
✔ Use sticky stabilizer for tricky fabrics
✔ Mark center points for precise alignment
✔ Use hoop clips for extra grip
✔ Always test hoop stability before stitching
✔ Keep fabric grain straight
Hoop vs Floating Method (When to Use Each)
Hooping:
Best for stable control and most embroidery projects.
Floating:
Fabric is placed on top of hooped stabilizer.
Use floating for:
- Thick fabrics
- Hard-to-hoop items
- Small or delicate areas
Troubleshooting Hoop Problems
Problem: Fabric shifts during stitching
✔ Fix: tighten hoop + use stronger stabilizer
Problem: Puckering after embroidery
✔ Fix: reduce tension + avoid overstretching
Problem: Misaligned design
✔ Fix: re-check hoop placement and center marks
Beginner Hoop Practice Tip
Before stitching real projects, practice hooping on scrap fabric.
This builds muscle memory and reduces costly mistakes.
Final Thought
Hooping might seem like a small step, but it controls almost everything in machine embroidery quality.
Master this, and your designs stop “misbehaving”… and start looking exactly like you imagined.