If you’ve ever wondered why one embroidery design looks crisp and professional while another puckers, stretches, or shifts, the answer is often the stabilizer.
Choosing the right machine embroidery stabilizer is one of the most important decisions you’ll make before stitching. Even the most expensive embroidery machine can’t produce beautiful results without the proper support underneath the fabric.
In this complete Machine Embroidery Stabilizer Guide, you’ll learn the different types of stabilizers, when to use them, and how to select the best one for every embroidery project.
What Is an Embroidery Stabilizer?
An embroidery stabilizer is a backing material placed behind (or sometimes on top of) fabric to keep it stable while your embroidery machine stitches.
It helps:
- Prevent fabric stretching
- Reduce puckering
- Keep stitches aligned
- Support dense embroidery designs
- Improve stitch quality
- Protect delicate fabrics
Think of the stabilizer as the foundation of your embroidery project. Without it, even a beautifully digitized design can fail.
Why Is Stabilizer So Important?
During embroidery, thousands of stitches pull and push the fabric in different directions.
Without proper support, you may notice:
- Wrinkled fabric
- Distorted designs
- Gaps in stitching
- Misaligned outlines
- Uneven lettering
- Thread tension problems
Using the correct stabilizer helps the fabric stay in place from the first stitch to the last.
Types of Machine Embroidery Stabilizers
Each stabilizer is designed for specific fabrics and embroidery techniques.
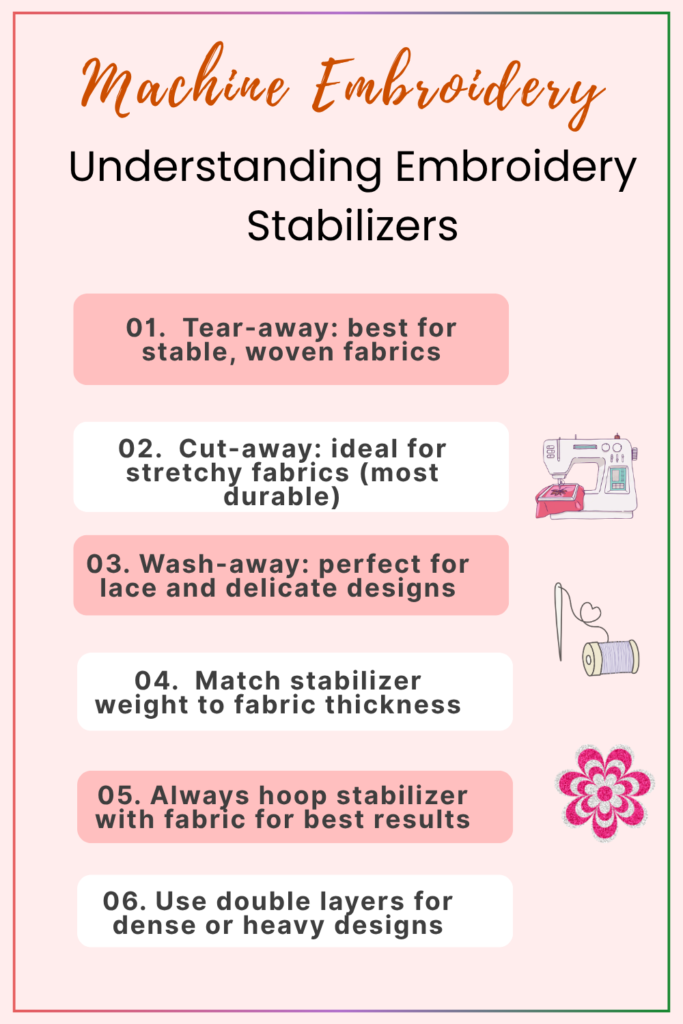
1. Cut-Away Stabilizer
Best for:
- T-shirts
- Sweatshirts
- Baby clothes
- Knit fabrics
- Stretch fabrics
How it works
After embroidery, you trim away the excess stabilizer around the design, leaving the portion underneath permanently attached.
Advantages
✔ Excellent support
✔ Prevents stretching
✔ Perfect for dense embroidery
✔ Long-lasting stability
Disadvantages
- Cannot be removed completely
- Slightly thicker finish
2. Tear-Away Stabilizer
Best for:
- Cotton
- Linen
- Canvas
- Towels with stable woven backing
- Quilting cotton
How it works
After stitching, simply tear away the excess stabilizer from around the design.
Advantages
✔ Fast removal
✔ Clean appearance
✔ Great for woven fabrics
✔ Beginner-friendly
Disadvantages
- Not ideal for stretchy materials
- Less support than cut-away
3. Wash-Away (Water-Soluble) Stabilizer
Best for:
- Lace embroidery
- Freestanding lace (FSL)
- Towels
- Plush fabrics
- Sheer fabrics
How it works
The stabilizer dissolves completely in warm water after the project is finished.
Advantages
✔ Leaves no residue
✔ Perfect for delicate projects
✔ Excellent for decorative embroidery
4. Heat-Away Stabilizer
Best for:
- Velvet
- Specialty fabrics
- Projects that shouldn’t get wet
How it works
The stabilizer disappears when heat is applied according to the manufacturer’s instructions.
Advantages
✔ No washing required
✔ Useful for moisture-sensitive fabrics
5. Sticky (Self-Adhesive) Stabilizer
Best for:
- Small embroidery items
- Caps
- Pockets
- Baby shoes
- Hard-to-hoop projects
How it works
The stabilizer has an adhesive surface that holds fabric in place without traditional hooping.
Advantages
✔ Great for difficult items
✔ Helps prevent fabric distortion
✔ Excellent for delicate projects
6. Water-Soluble Topping
Unlike traditional stabilizers, topping sits on top of the fabric instead of underneath.
Best for:
- Towels
- Fleece
- Sherpa
- Velvet
- Minky fabric
Why use it?
It prevents stitches from sinking into textured fabrics, resulting in cleaner, sharper embroidery.
How to Choose the Right Stabilizer
The easiest way is to match the stabilizer to your fabric.
| Fabric | Recommended Stabilizer |
| Cotton | Tear-away |
| Quilting Cotton | Tear-away |
| Canvas | Tear-away |
| T-shirts | Cut-away |
| Jersey Knit | Cut-away |
| Sweatshirts | Cut-away |
| Baby Onesies | Cut-away |
| Towels | Tear-away + Water-soluble topping |
| Fleece Blankets | Cut-away + Water-soluble topping |
| Sherpa | Cut-away + Water-soluble topping |
| Freestanding Lace | Wash-away |
| Organza | Wash-away |
| Delicate Fabrics | Wash-away |
How Design Density Affects Stabilizer Choice
The denser the embroidery design, the stronger the stabilizer should be.
Light Designs
Examples:
- Small monograms
- Simple outlines
- Minimal lettering
Usually require:
- One layer of tear-away
Medium Density Designs
Examples:
- Floral patterns
- Logos
- Decorative lettering
Often require:
- Medium-weight cut-away or tear-away
Dense Designs
Examples:
- Large filled designs
- Appliqué
- Full coverage embroidery
Usually benefit from:
- Heavy cut-away
- Two layers if necessary
Common Stabilizer Mistakes
Using Tear-Away on Stretch Fabric
Stretch fabric continues moving after the stabilizer is removed, leading to puckering.
Better choice: Cut-away.
Skipping Water-Soluble Topping
On towels or fleece, stitches sink into the fabric.
Better choice: Add topping.
Using Too Little Stabilizer
Dense embroidery needs stronger support.
Don’t hesitate to use two layers when necessary.
Using More Stabilizer Than Needed
Too much stabilizer can make embroidery stiff and uncomfortable, especially on garments.
Aim for enough support without adding unnecessary bulk.
Stabilizer Tips for Better Machine Embroidery
✔ Match stabilizer to the fabric, not just the design.
✔ Test new stabilizers on scrap fabric before stitching your final project.
✔ Keep stabilizers stored flat and dry to prevent damage.
✔ Label your stabilizers so they’re easy to identify.
✔ When in doubt, choose slightly more support rather than too little.
Quick Stabilizer Cheat Sheet
Stretch fabric?
→ Cut-away
Cotton fabric?
→ Tear-away
Towels or fleece?
→ Tear-away or cut-away + water-soluble topping
Freestanding lace?
→ Wash-away
Small difficult-to-hoop items?
→ Sticky stabilizer
Dense embroidery?
→ Heavy cut-away
Frequently Asked Questions
Can I embroider without a stabilizer?
Technically yes—but the results are rarely good. Most fabrics will stretch, pucker, or distort without proper stabilization.
Can I use two stabilizers together?
Absolutely. Combining a backing stabilizer with a water-soluble topping is common for textured fabrics like towels and fleece.
Which stabilizer is best for beginners?
Tear-away stabilizer is often the easiest to work with on stable woven fabrics, while cut-away is the safest option for garments made from knit or stretchy materials.
Final Thought
If embroidery thread is the paint and your machine is the brush, then the stabilizer is the canvas that holds everything together.
Learning how to choose the right stabilizer is one of the fastest ways to improve your embroidery. With the proper backing, you’ll notice cleaner lettering, smoother satin stitches, less puckering, and more professional-looking projects—no matter what fabric you’re stitching on.
The right stabilizer doesn’t just support your fabric; it supports every successful embroidery project you’ll create.