Choosing the right needle for machine embroidery is one of the simplest ways to instantly improve your stitch quality—but it’s also one of the most overlooked steps.
If your thread keeps breaking, your fabric puckers, or your designs look uneven, the needle is often the hidden problem.
This guide will help you understand machine embroidery needle types, sizes, and best uses so you can get clean, professional results every time.
Why the Right Embroidery Needle Matters
The needle is not just a “small part” of your machine—it directly affects:
- Stitch quality
- Thread tension
- Fabric damage prevention
- Design clarity
- Thread break frequency
A wrong needle can ruin even the best embroidery design.
Think of it as the “translator” between your machine and your fabric.
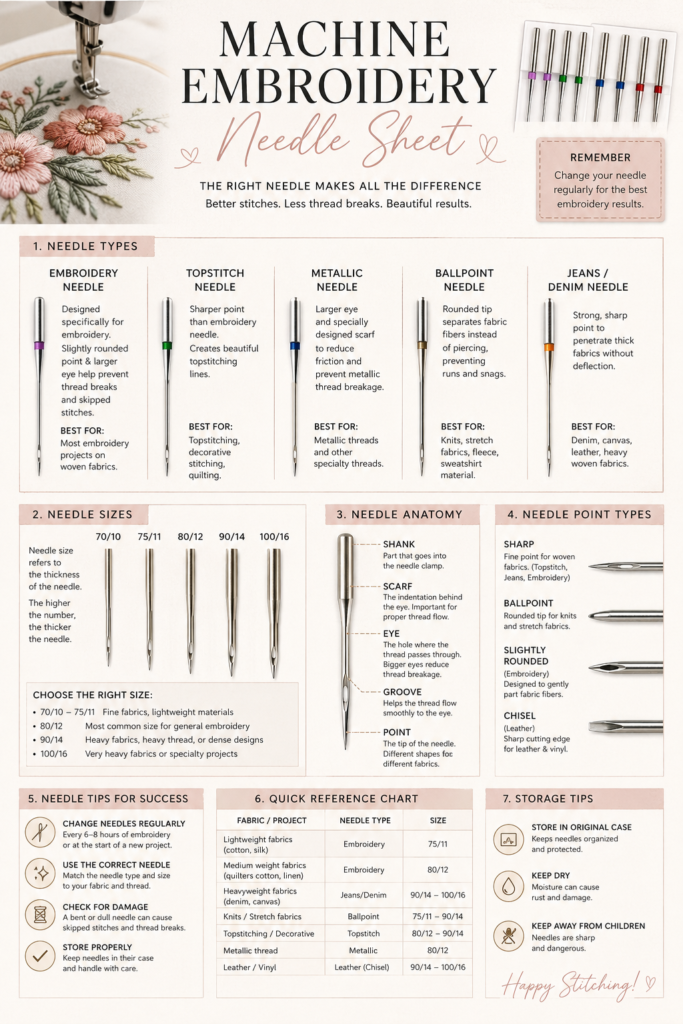
1. Embroidery Needles (The Standard Choice)
For most machine embroidery projects, you should start here.
Best for:
- General embroidery
- Most fabrics (cotton, blends, polyester)
- Standard designs
Why they work:
Embroidery needles have a slightly larger eye, which reduces thread friction and helps prevent breaking.
Common sizes:
- 75/11: lightweight to medium fabrics
- 90/14: thicker fabrics or heavier stitching
👉 If you’re unsure, 75/11 is usually the safest starting point.
2. Ballpoint Needles (For Knit Fabrics)
Ballpoint needles are designed to slide between fabric fibers instead of piercing them.
Best for:
- T-shirts
- Jersey
- Stretch fabrics
- Activewear
Why they matter:
They prevent holes, snags, and distortion in stretchy materials.
👉 If your embroidery is going on anything that stretches, this needle is your friend.
3. Sharp Needles (For Woven Fabrics)
Sharp needles have a very pointed tip designed to penetrate tightly woven fabrics cleanly.
Best for:
- Denim
- Canvas
- Linen
- Heavy cotton
Why they matter:
They ensure precise penetration without pushing fibers aside.
👉 Great for structured embroidery designs on stable fabrics.
4. Metallic Needles (For Decorative Threads)
Metallic threads are beautiful—but difficult.
Best for:
- Metallic embroidery thread
- Decorative stitching
- Special effects designs
Why they matter:
They have a larger, smoother eye to reduce thread shredding.
👉 If your metallic thread keeps snapping, this needle fixes that problem.
5. Understanding Needle Sizes (75/11 vs 90/14)
Needle size affects how the needle interacts with fabric and thread.
Simple rule:
- Lower number = finer needle (lighter fabrics)
- Higher number = thicker needle (heavier fabrics)
Quick guide:
- 70/10 → very delicate fabrics
- 75/11 → standard embroidery (most common)
- 80/12 → medium-weight fabrics
- 90/14 → thick fabrics or dense stitching
6. How to Know If You’re Using the Wrong Needle
Your machine usually gives warning signs:
- Thread breaking frequently
- Skipped stitches
- Fabric puckering
- Loud “punching” sound
- Uneven stitch quality
👉 If two or more of these appear, change the needle first.
7. How Often Should You Change Your Needle?
A dull needle causes more problems than beginners realize.
Rule of thumb:
- Every 8–10 hours of stitching
- Or after every large project
Even if it looks fine, it might already be causing damage.
8. Beginner-Friendly Needle Setup Strategy
If you’re just starting machine embroidery:
✔ Start with 75/11 embroidery needle
✔ Use polyester embroidery thread
✔ Test on scrap fabric first
✔ Adjust only if problems appear
Keep it simple before experimenting.
9. Matching Needle + Fabric + Thread (The Winning Formula)
Perfect embroidery happens when all three work together:
- Needle = correct penetration
- Fabric = correct structure
- Thread = correct flexibility
Example combinations:
- Cotton + 75/11 embroidery needle + polyester thread
- T-shirt + ballpoint needle + cut-away stabilizer
- Denim + 90/14 needle + sharp point
10. Quick Troubleshooting Checklist
If something goes wrong:
- Change needle first
- Check thread quality
- Check stabilizer
- Adjust tension
- Re-test design
Most problems are solved at step 1.
Final Thought
Most embroidery problems aren’t machine problems—they’re needle problems in disguise.
Once you understand which needle to use and when, your stitching becomes smoother, cleaner, and far more predictable.
And suddenly, your machine stops acting “random”… and starts behaving like it actually likes you.